Sprinter Van Bed Platform Plans: Your Ultimate Build
Your ultimate sprinter van bed platform build starts with a solid plan, ensuring comfort and efficiency for your mobile adventures. This guide provides clear steps, material lists, and design ideas to create a robust and personalized sleeping space.
Dreaming of life on the road in your Mercedes-Benz Sprinter? The heart of any van build, especially for living and traveling, is a comfortable and functional bed. But where do you begin with building a bed platform? Many owners find themselves staring at their empty van, envisioning a cozy retreat, yet unsure how to turn that vision into reality. This might seem like a daunting task, but with the right guidance and a clear plan, constructing your sprinter van bed platform can be an achievable and rewarding project. We’ll break down everything you need to know, from choosing materials to the final assembly, making your van life dreams a tangible comfort. Get ready to learn exactly how to build a bed platform that perfectly suits your Sprinter and your lifestyle.
Frequently Asked Questions
What is a sprinter van bed platform?
A sprinter van bed platform is a sturdy, elevated structure built inside your van to support a mattress. It creates a dedicated sleeping area, often with storage space underneath.
Why build a bed platform instead of just putting a mattress on the floor?
A platform offers several advantages: it keeps your mattress off the cold van floor, provides a cleaner sleeping surface, allows for valuable under-bed storage, and elevates your sleeping area for a more comfortable and spacious feel. It also creates a defined “bedroom” zone.
What are the most common materials for a bed platform?
Plywood (like maple, birch, or even standard construction grade), dimensional lumber (such as 2x4s or 2x6s), and various fasteners (screws, bolts) are the most common materials. Some opt for lighter weight options like aluminum, but wood is generally more beginner-friendly.
How much weight can a typical sprinter van bed platform support?
A well-built wooden platform using 2×4 framing and plywood top can easily support 500-800 lbs, more than enough for two people and even pets. The key is proper framing and secure attachment to the van’s structure.
Do I need special tools to build a sprinter van bed platform?
Basic woodworking tools are usually sufficient. You’ll need a measuring tape, pencil, saw (circular saw or miter saw), drill/driver, level, and safety gear (glasses, gloves). A sander is helpful for finishing.
How do I attach the bed platform to my Sprinter van?
The most secure method involves bolting the platform frame directly to the van’s existing structural ribs or floor mounting points. Be sure to use appropriate hardware, like carriage bolts, and consider using nuts and washers. Never attach solely to the van’s thin metal skin.
Can I design a bed platform with storage?
Absolutely! A popular feature of van bed platforms is the integrated storage. You can build drawers, lift-up tops, or simple open compartments underneath to store clothing, gear, or supplies.
The Foundation: Planning Your Sprinter Van Bed Platform

Before you pick up a single piece of lumber, taking the time for meticulous planning is crucial. This phase is where you translate your desires for comfort and utility into a concrete design. For your sprinter van bed platform, consider the core elements that will make it functional and fit your specific Sprinter model and how you plan to use the space.
Key Design Considerations
- Bed Size: What mattress size will you use? Common choices for vans include twin, full, or custom queen sizes. Measure your available space carefully, accounting for van width, wheel wells, and desired aisle space.
- Height: How high do you want the bed platform? A higher platform offers more storage underneath, perfect for bikes, camping gear, or even a mini-garage. A lower platform provides a more open feel within the van. Aim for at least 4 feet of clearance underneath if you plan to store larger items.
- Shape and Layout: Will it be a full-width bed, a murphy bed that folds against the wall, a fixed platform, or a convertible dinette bed? Consider how you’ll access the storage below.
- Ventilation: Ensure there’s good airflow around the mattress and within any storage compartments.
- Weight: While robust construction is key, consider the overall weight of your platform, as it affects your van’s fuel efficiency and handling.
- Van Constraints: Account for internal van features like raised floor sections, wheel wells, and the curvature of the walls.
Measuring Your Sprinter’s Interior
Precision is paramount. Use a reliable tape measure to capture all critical dimensions. Don’t just measure the floor; measure the height at various points and the width between the panels where you intend to build. Sketch your van’s interior, marking critical measurements and any obstructions over the framework.
Tip: Use painter’s tape on the van floor to map out your bed platform’s dimensions. This allows you to visualize the footprint and ensure adequate walking or moving space around it. Walk around it, open doors, and test movement to confirm the layout works.
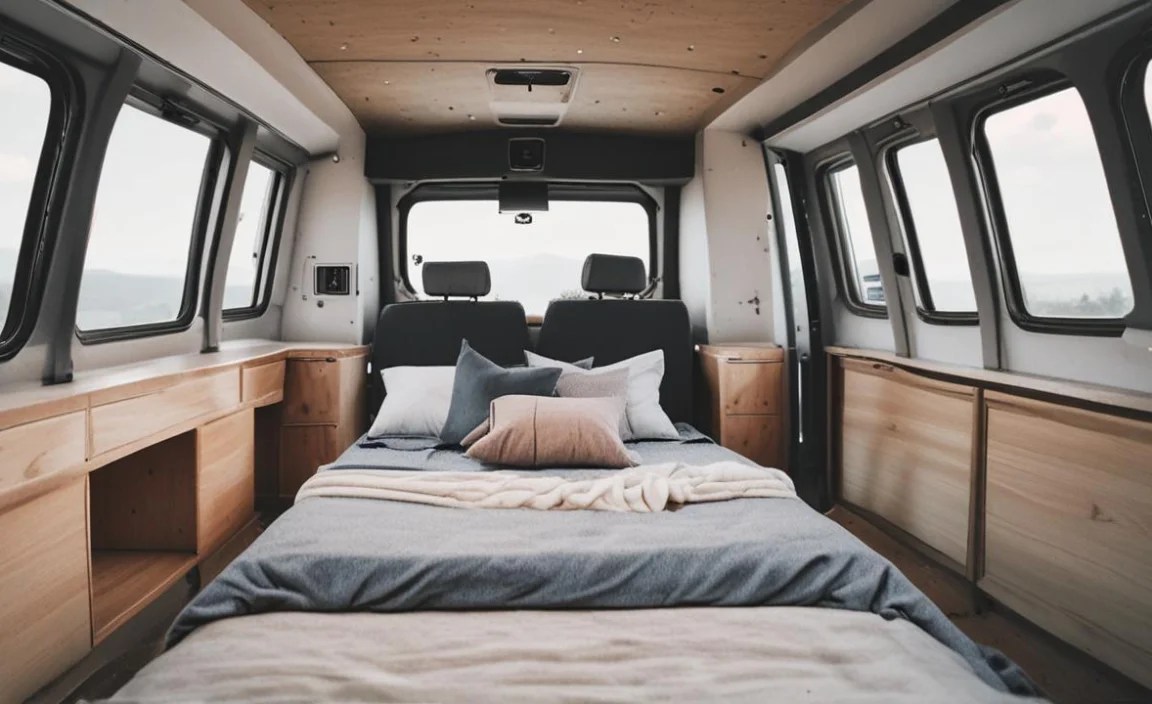
Popular Sprinter Van Bed Platform Styles
There are several popular designs, each offering unique benefits:
- Fixed Platform with Under-Bed Storage: This is the most common and arguably the easiest for beginners. It’s a sturdy, elevated rectangular frame that provides ample storage space underneath. You can add drawers, doors, or leave it open.
- Convertible Dinette Bed: This design transforms a seating area (dinette) into a bed. It requires more complex joinery and mechanisms but offers dual functionality.
- Murphy Bed: This bed folds up against the wall when not in use, maximizing living space during the day. It requires robust hinges and support systems.
- Elevated Rear Bed: Often built towards the rear of the van, this style maximizes living space in the front van area and offers significant storage (garage) underneath.
Sketching Your Blueprint
Once you have your measurements and chosen style, it’s time to create a detailed sketch or digital plan. You can use graph paper, a whiteboard, or even free design software like SketchUp. Your plan should include:
- Overall dimensions of the platform.
- Height from the floor.
- Location and dimensions of any support legs or framing members.
- Placement and size of any storage compartments, drawers, or access panels.
- How the platform will attach to the van structure.
Materials and Tools for Your Build

Choosing the right materials and having the necessary tools will streamline your building process and contribute to a durable, functional bed platform. Prioritize materials that offer a good balance of strength, weight, and ease of use for a beginner.
Recommended Materials
For a robust yet manageable build, here are common material choices:
| Material | Pros | Cons | Typical Thickness/Size |
|---|---|---|---|
| Plywood (Birch, Maple, or Baltic Birch) | Strong, stable, smooth surface, good for tops and supports. Baltic birch is exceptionally strong and void-free. | Can be heavy depending on thickness. Requires sealing or finishing. | 1/2″ or 3/4″ for tops, 3/4″ for supports. |
| Dimensional Lumber (2x4s, 2x6s) | Readily available, strong, easy to work with, cost-effective for framing. | Heavier than some alternatives. Requires proper sealing/finishing to prevent mold/mildew. | Standard 2×4 (actual dimensions ~1.5″ x 3.5″) or 2×6 (~1.5″ x 5.5″). |
| Hardwood Plywood (e.g., Oak) | More aesthetically pleasing grain and finish. Very strong. | More expensive than standard plywood. Can be heavier. | 1/2″ or 3/4″. |
| Lightweight Plywood (e.g., Poplar Pine) | Lighter than traditional hardwoods. | Less dense, may not be as strong for heavy-duty framing. | 1/2″ or 3/4″. |
| Fasteners (Screws, Bolts) | Essential for joining components securely. Use deck screws for wood, lag bolts or carriage bolts for frame-to-van attachment. | Ensure you use appropriate lengths and types for strength. | Varies based on wood thickness and load. Typically 1 1/4″ to 2 1/2″ wood screws. For van attachment, 1/4″ or 3/8″ bolts with large washers and nuts. |
| Wood Glue | Adds significant strength to all wood joints. | Requires drying time. | Standard wood glue. |
For attachment to the van: You will need carriage bolts or lag bolts, large washers, and locknuts (Nylock nuts are recommended) to securely fasten the platform frame to the Sprinter’s steel frame or floor mounting points. Avoid drilling into the van’s body panels unsecured.
Essential Tools
Having the right tools makes the job safer and more efficient. For a beginner-friendly build, you’ll likely need:
- Measuring Tape: Accurate measurements are critical.
- Pencil: For marking cuts and measurements.
- Safety Glasses: Always protect your eyes.
- Work Gloves: To protect your hands.
- Circular Saw or Miter Saw: For making straight, accurate cuts. A miter saw will provide cleaner, more precise cuts for framing. Learn more about essential power tools for van building at Family Handyman.
- Drill/Driver: For pre-drilling holes and driving screws.
- Drill Bits: Including pilot bits for screws and larger bits for bolts.
- Level: To ensure your platform is even.
- Clamps: Useful for holding pieces together while gluing or fastening.
- Sander (Orbital or Belt) and Sandpaper: For smoothing edges and preparing surfaces for finishing.
- Square (Combination or Speed Square): For marking accurate 90-degree angles.
Step-by-Step Sprinter Van Bed Platform Build
Let’s dive into the construction process. This guide focuses on a common, sturdy fixed platform with under-bed storage, ideal for beginners. Always adapt these steps to your specific design and van layout.
Step 1: Prepare the Van Interior
Start with a clean slate. Remove any factory flooring or trim that will be in the way. If you plan to insulate and add interior paneling, now is the time before building the platform. Ensure the floor and walls where the platform will connect are clean and accessible.
Step 2: Cut Your Lumber and Plywood
Based on your plan, carefully measure and cut all the pieces for your frame (e.g., 2x4s) and your platform top (e.g., 3/4″ plywood). Double-check all measurements before cutting. For a clean finish, consider having a hardware store or lumber yard make the initial large cuts on your plywood.
Step 3: Assemble the Main Frame
This is the support structure for your bed. For a common rectangular platform, you’ll typically build one or more rectangular “boxes” or a robust perimeter frame. Use wood glue on all joints and secure them with screws. Ensure all corners are square.
Example Frame Construction:
- Cut four pieces of 2×4 to create a perimeter rectangle that fits your desired bed dimensions.
- Cut additional 2x4s to act as interior crossbeams for added support. Spacing these about 16-24 inches apart is a good rule of thumb.
- Assemble the perimeter first, using wood glue and 2.5” screws, ensuring it’s square.
- Attach the crossbeams flush with the top of the perimeter frame, again using glue and screws.
Step 4: Create Support Legs or Bulkheads
Depending on the height and span of your platform, you’ll need additional vertical supports. These can be simple 2×4 legs or more substantial box-frame bulkheads. Ensure the tops of these supports are perfectly level and flush with the top of your main frame where the plywood will sit.
For a high bed: You might build sturdy side frames or bulkheads that span from floor to platform height. These can be constructed from 3/4″ plywood or 2x4s to create hollow “boxes” that are strong and relatively lightweight.
For a lower bed: Simple 2×4 legs bolted directly to the van floor framing can suffice. Position them strategically to avoid obstructing desired storage areas.
Step 5: Attach the Frame to the Van
This is a critical step for safety and stability. Locate your van’s structural ribs or threaded mounting points. These are typically along the floor edges and sometimes in the center. If you’re drilling into the floor, ensure you’re using the van’s factory anchor points or reinforcing the floor where you drill. A common and secure method involves drilling through your frame’s support legs or perimeter, into the van’s metal floor structure or ribs, and securing with bolts, large washers, and locknuts. Use a drill bit appropriate for the bolts you’re using.
Recommended Attachment Points:
- Factory Floor Mounts: Many Sprinters have threaded holes in the floor or tie-down points. These are ideal.
- Ribs/Support Beams: The metal ribs that form the van body often extend down to the floor.
- Avoid: Drilling only into the thin corrugated floor metal without hitting a structural beam.
Important: Always use large washers on both sides of the bolt to distribute the load and prevent the bolt head or nut from pulling through the metal. A torque wrench can help ensure bolts are tightened sufficiently but not overly so.
Step 6: Install the Platform Top
Once the frame is securely attached to the van, lay your pre-cut plywood top(s) onto the frame. You may need multiple pieces depending on your design and plywood size. Ensure they fit snugly. Secure the plywood to the frame using wood glue and 1 1/4” or 1 1/2” screws. Space screws about every 6-8 inches along the frame and crossbeams for maximum stability. Pre-drilling pilot holes will prevent the wood from splitting.
If creating access hatches: Cut out sections of the plywood before securing to the frame, then build simple frames or use hinges and latches for access.
Step 7: Add Finishing Touches
Sand down all rough edges and surfaces to create a smooth, safe finish. Whether you plan to paint, stain, or seal your platform, a good sanding is key. Apply your desired finish to protect the wood from moisture and wear, and to give it a finished look.
Consider adding features like:
- Toe kicks: To make the base look more built-in.
- Stairs or a small ladder: If the bed is high.
- Drawer slides or hinges: For storage access.
- Edge banding: For a cleaner look on plywood edges.
Elevating Your Build: Storage & Design Ideas

The bed platform is more than just a place to sleep; it’s a central piece of your van’s interior design and functionality. Optimizing the space underneath the platform can transform your Sprinter into an incredibly efficient mobile home.
<h3 id=”under-bed-storage-


