Sprinter Van Lighting Systems: Ultimate Luxury
Sprinter van lighting systems can transform your vehicle into a luxurious, functional living or working space with the right choices and installation. This guide will help you understand the options to create the perfect ambiance and utility for your Mercedes-Benz Sprinter.
The interior of a Mercedes-Benz Sprinter van is a blank canvas. Whether you’re outfitting it for weekend adventures, a mobile office, or a full-time home on wheels, the lighting you choose is crucial. It’s not just about seeing; it’s about creating an atmosphere, enhancing functionality, and adding a touch of luxury that elevates your Sprinter experience. Often, the factory lighting can feel a bit utilitarian, leaving you yearning for something more. Don’t worry, upgrading your Sprinter van lighting systems is more accessible than you might think. We’ll guide you through designing a system that’s both practical and beautiful.
Understanding Sprinter Van Lighting Systems
When we talk about “Sprinter van lighting systems,” we’re referring to the entire setup of lights within your vehicle, encompassing everything from the type of bulbs to the placement, brightness, color, and control mechanisms. A well-designed system considers different lighting needs throughout the day and for various activities, seamlessly blending utility with aesthetic appeal.
The Importance of Thoughtful Lighting
Think about how lighting affects your mood and productivity in your home. The same principles apply to your Sprinter. Poor lighting can make a space feel cramped, unwelcoming, and difficult to use. Conversely, the right lighting can make a small space feel larger, more inviting, and perfectly suited for its purpose. For a luxury Sprinter build, lighting is a key component in achieving that high-end feel.
Key Considerations for Your Sprinter Lighting System:
- Functionality: You need task lighting for cooking, reading, or working, as well as ambient lighting for relaxation.
- Atmosphere: Warm, dimmable lights create a cozy evening environment, while brighter, cooler lights are better for daytime tasks.
- Energy Efficiency: Especially crucial for off-grid living, choosing efficient LED lights is essential.
- Control: How easy is it to turn lights on/off, dim them, or change their color? Smart controls offer the most flexibility.
- Aesthetics: The style and placement of fixtures contribute significantly to the overall look and feel of your van.
Types of Sprinter Van Lighting

The world of van lighting has evolved dramatically, with LED technology leading the charge due to its efficiency, durability, and versatility. For your Sprinter, you’ll typically encounter a few main types of lighting fixtures, each serving a distinct purpose.
1. Ambient Lighting
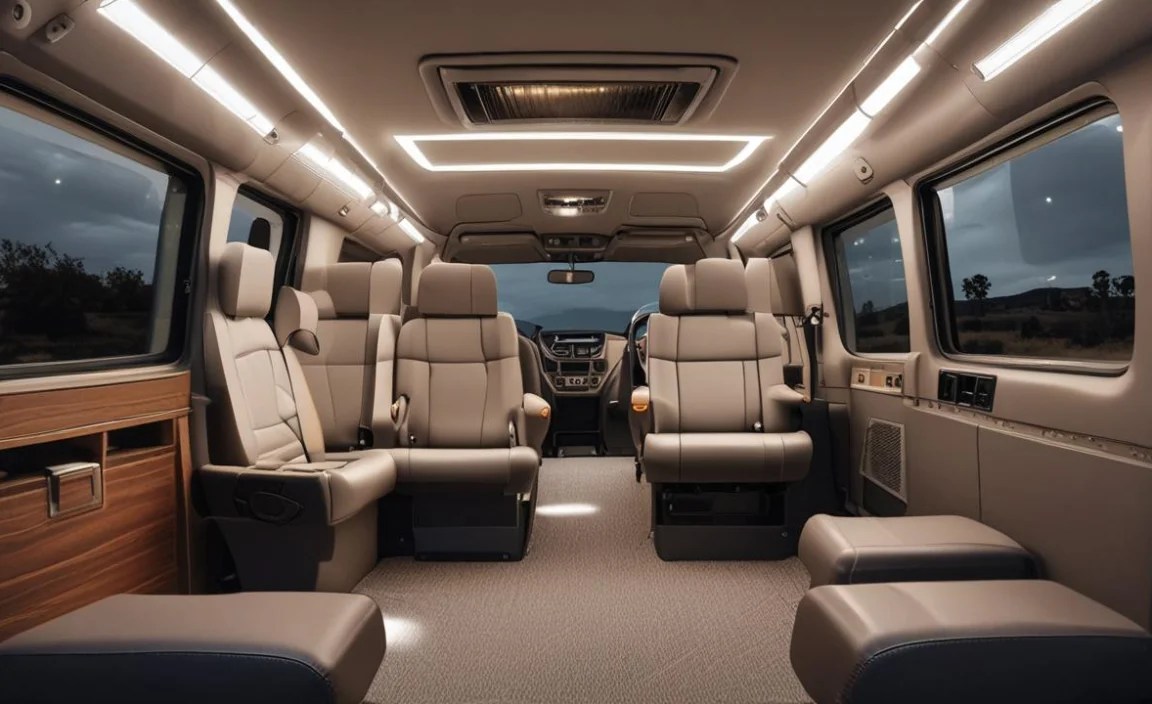
Ambient lighting provides the general illumination for the space. It sets the overall mood and is often the first layer of light you’ll notice. This is where you can truly inject luxury into your Sprinter.
Options for Ambient Lighting:
- Recessed LED Downlights: These are sleek, unobtrusive, and provide even illumination. They can be strategically placed along the ceiling for a sophisticated look. Look for models with adjustable color temperature (warm white to cool white) and dimming capabilities.
- LED Strip Lights: Flexible LED strips can be mounted under cabinets, along ceiling coves, or behind panels to create a soft, diffused glow. They are excellent for adding depth and a modern, high-end feel. RGB (Red, Green, Blue) LED strips offer the ultimate luxury, allowing you to change colors to match your mood or decor.
- Pendant Lights: For a truly luxurious touch, consider stylish pendant lights over a galley kitchen or a small dining area. These can become focal points and add significant character. Ensure they are securely mounted for vehicle travel.
2. Task Lighting
Task lighting is focused illumination designed for specific activities. It needs to be brighter and more direct than ambient lighting.
Examples of Task Lighting:
- Reading Lights: Adjustable spotlights or flexible gooseneck lamps are perfect for bedside reading or around a desk. Many modern Sprinter van conversions feature these integrated into overhead cabinetry.
- Kitchen/Galley Lights: Under-cabinet LED strips or small, focused downlights directly above countertops and sink areas are essential for safe food preparation.
- Work Area Lights: If you plan to use your Sprinter as a mobile office, consider a dedicated, bright light for your workspace.
3. Accent Lighting
Accent lighting draws attention to specific features or architectural elements within your van, adding visual interest and a touch of drama.
Ideas for Accent Lighting:
- Backlighting: Illuminate logos, artwork, or shelving with subtle backlighting.
- Toe Kick Lighting: Small LED lights installed at the base of cabinets can highlight the cabinetry and add a floating effect.
- Color-Changing LEDs: Use RGB strips to highlight specific areas, perhaps changing color to complement your evening ambiance.
Choosing the Right LED Technology

LEDs (Light Emitting Diodes) are the standard for modern vehicle lighting due to their numerous advantages over older incandescent or fluorescent technologies.
Key LED Metrics for Sprinter Van Lighting:
- Lumens (lm): This measures the brightness of a light source. More lumens mean a brighter light.
- Wattage (W): This indicates the power consumption. LEDs are very low wattage, which is ideal for battery-powered van systems.
- Color Temperature (Kelvin, K): This describes the color of the light.
- Warm White (2700K-3000K): Mimics incandescent bulbs, creating a cozy and relaxing atmosphere. Ideal for living areas.
- Neutral White (3500K-4000K): A balanced white light that’s good for general illumination and areas where color rendering is important, like a kitchen.
- Cool White/Daylight (5000K-6500K): Brighter, bluer light that can feel more sterile but is excellent for task lighting where alertness is needed.
- Color Rendering Index (CRI): This measures how accurately a light source reveals the true colors of objects. A CRI of 80+ is generally good, while 90+ is considered excellent and contributes to a more luxurious feel.
Designing Your Sprinter Van Lighting Layout
A well-thought-out lighting plan is crucial for both functionality and aesthetics. Consider the different zones within your Sprinter and their primary uses.
Step-by-Step Lighting Design Process:
- Map Your Van Layout: Sketch out your Sprinter’s interior, marking key areas like the sleeping area, kitchen, seating/dining area, workspace, and bathroom.
- Identify Lighting Needs for Each Zone:
- Living Area: Ambient lighting for relaxation, perhaps dimmable, with task lights for reading.
- Kitchen: Bright task lighting for food prep, plus general ambient light.
- Bedroom: Cozy, dimmable ambient light, with focused reading lights by the bed.
- Workspace: Bright, focused task lighting to prevent eye strain.
- Choose Fixture Types: Select a mix of ambient, task, and accent lighting fixtures that suit your style and needs.
- Determine Placement: Consider how the light will fall. Avoid harsh shadows or glare. Staggering lights can create a more dynamic feel. Think about where you’ll be standing or sitting when using specific lights.
- Plan for Control: Decide how you want to control your lights. Will you use simple on/off switches, dimmer knobs, or a more advanced smart control system? Consider zoning so you can control different groups of lights independently.
- Consider Power Requirements: Estimate the total wattage of your chosen lights and ensure your van’s electrical system can support them.
Installation Essentials for Sprinter Van Lighting Systems
Installing a lighting system in your Sprinter involves working with electrical components. If you’re not comfortable with electrical work, it’s always best to consult a professional. However, understanding the basics is beneficial.
Tools You Might Need:
- Wire strippers
- Wire crimpers
- Screwdrivers
- Drill with various bits
- Wire connectors (e.g., WAGO connectors, crimp connectors)
- Electrical tape
- Multimeter (for testing voltage and continuity)
- Heat gun (for heat shrink tubing)
- Silicone sealant (for weatherproofing where necessary)
Basic Installation Steps (General Guide):
- Plan Your Wiring Runs: Determine the path for your wires, often hidden within walls or ceiling panels.
- Install Fixtures: Mount your chosen light fixtures according to their instructions. This may involve drilling holes or using adhesive mounts.
- Connect to Power Source: Wire your lights to your vehicle’s auxiliary battery system, ensuring proper fusing for each circuit. It’s highly recommended to use a dedicated fuse block for your lighting system.
- Wire Controls: Connect switches, dimmers, or smart controllers to your lighting circuits.
- Test Thoroughly: Before sealing up any panels, test each light and control to ensure everything is working correctly and safely. Check for any shorts or loose connections.
Safety First:
Always disconnect your battery before beginning any electrical work. Use appropriate gauge wiring for the current draw of your lights. Consult resources like the U.S. Department of Energy’s guide on understanding LEDs for more information on lighting technology and efficiency.
Controlling Your Sprinter Van Luxury Lighting
The ability to control your lighting is paramount to creating that ultimate luxury feel. Simple switches are basic, but dimmers and smart systems offer far more sophistication.
Dimmers
Dimmer switches allow you to adjust the brightness of your lights, which is essential for transitioning from bright daytime activity to a cozy evening ambiance. They are a relatively simple upgrade that significantly enhances the user experience.
Smart Lighting Systems
For the ultimate in luxury and convenience, consider a smart lighting system. These systems, often controlled via a smartphone app or a dedicated control panel, offer:
- Remote Control: Turn lights on or off from anywhere.
- Scene Setting: Create pre-programmed lighting “scenes” for different activities (e.g., “Movie Night,” “Dinner Party,” “Reading Mode”).
- Scheduling: Automate lights to turn on or off at specific times.
- Color Control: If using RGB LEDs, you can select from millions of colors.
- Integration: Many smart systems can integrate with other smart van components.
Examples of popular components for van-specific smart lighting include systems from companies like Victron Energy (especially their Cerbo GX and touch displays for integration) and various custom caravan/RV lighting controllers. For DIY enthusiasts, platforms like Raspberry Pi or Arduino offer incredible customization, though they require more technical expertise.
Luxurious Sprinter Lighting Fixture Examples
The appearance of your light fixtures is as important as their function when aiming for a luxury build. Here are some ideas and types of fixtures that lend themselves to a refined aesthetic.
Table: High-End Sprinter Van Lighting Fixtures
| Fixture Type | Material & Finish | Typical Use | Luxury Appeal |
|---|---|---|---|
| Recessed Ceiling Spotlights | Brushed nickel, matte black, or polished chrome bezels. | General illumination (living, kitchen, hallway). | Sleek, integrated look; adjustable color temperature adds versatility. |
| Dimmable LED Strips/Coves | Aluminum channels with frosted or clear diffusers. | Under cabinets, toe kicks, ceiling features, backlighting. | Creates a soft, diffused ambiance; adds depth and modern sophistication. |
| Designer Pendant Lights | Glass, metal (brass, copper, black), woven natural materials. | Kitchen island, dining nook, entryway feature. | Statement pieces that add personality and a high-end residential feel. Requires secure mounting. |
| Adjustable Wall-Mounted Sconces | Brushed metal, minimalist designs. | Reading nooks, beside beds or seating areas. | Provides focused light with an elegant, functional design. |
| Smart Control Panels/Switches | Modern, minimalist designs with touch interfaces. | Centralized control for lighting system. | Enhances usability and offers a high-tech, seamless experience. |
Powering Your Luxury Lighting System
A luxurious lighting system is only as good as the power source that supports it. For Sprinter vans, especially those intended for off-grid use, a robust auxiliary electrical system is vital.
Key Components of a Sprinter Van Electrical System for Lighting:
- Auxiliary Battery Bank: Deep-cycle batteries (lithium-ion is popular for its longevity and weight) designed to provide sustained power without degrading.
- Shore Power Connection: Allows you to charge batteries and run AC appliances when plugged into an external power source.
- Inverter: Converts DC battery power to AC power for any AC-powered lights or devices. Most modern van LED lights run on 12V DC, so an inverter might not be needed for the lights themselves, but it’s crucial for other appliances.
- Solar Panels & Charge Controller: Harness solar energy to recharge your batteries, essential for extended off-grid trips.
- DC-DC Charger: Charges your auxiliary batteries from the vehicle’s alternator while driving.
- Fuse Block/Distribution Panel: Protects each circuit and provides a centralized point for wiring. This is a non-negotiable safety component.
Understanding your power needs is critical. A lighting system with many high-lumen LEDs, especially RGB options, can draw significant power. A detailed electrical diagram is a wise investment for any elaborate Sprinter build.
Frequently Asked Questions (FAQs)
Q1: What is the best type of lighting for a Sprinter van?
The best lighting for a Sprinter van is typically LED lighting. It’s energy-efficient, durable, and offers a wide range of color temperatures and brightness levels. Combining ambient, task, and accent lighting with smart controls provides the most luxurious and functional experience.
Q2: How much power do Sprinter van lights use?
LED lights are very power-efficient. A typical 12V LED strip light might use between 5-15 watts per meter. Recessed downlights can range from 3-10 watts each. The total power consumption depends on the number of lights, their brightness (lumens), and how long they are used. It’s essential to calculate your total wattage to size your auxiliary battery system correctly.
Q3: Can I install lighting myself in my Sprinter van?
Yes, many van owners install their own lighting. However, it involves working with 12V DC electrical systems. If you are not comfortable with wiring, fusing, and basic electrical safety, it’s highly recommended to hire a professional electrician or a professional van outfitter.
Q4: What is “dimmable” lighting?
Dimmable lighting means the brightness of the light can be adjusted using a dimmer switch. This is crucial for controlling the mood and functionality of your Sprinter’s interior, allowing you to have bright light for tasks and a softer glow for relaxation.
Q5: What does “color temperature” mean for lights?
Color temperature, measured in Kelvin (K), describes the color of the light emitted. Lower Kelvin numbers (e.g., 2700K-3000K) produce warm, yellowish light, like an old incandescent bulb, ideal for cozy spaces. Higher Kelvin numbers (e.g., 5000K-6500K) produce cool, bluish light, similar to daylight, which is better for task lighting.
Q6: How can I create a “luxury” feel with Sprinter van lighting?
To create a luxury feel, focus on a layered lighting approach with dimmable ambient lights (like hidden LED strips or recessed downlights), elegant task lighting, and potentially accent lighting. Using high-quality fixtures with refined finishes, incorporating smart control systems for custom scenes, and choosing warm color temperatures will significantly enhance the luxurious ambiance.
Conclusion
Elevating your Mercedes-Benz Sprinter with a thoughtfully designed lighting system is one of the most impactful upgrades you can make. It’s about much more than just illumination; it’s about crafting an environment that perfectly suits your needs and desires, whether that’s a cozy sanctuary for winding down after a day’s adventure or a vibrant, functional workspace. By understanding the different types of lighting,


