Mercedes Sprinter Van: Ultimate Pet-Friendly Modifications
Transform your Mercedes Sprinter van into the ultimate pet-friendly adventure vehicle with smart, comfortable, and safe modifications. From durable flooring and secure sleeping areas to climate control and thoughtful storage, these upgrades ensure happy trails for you and your furry co-pilots.
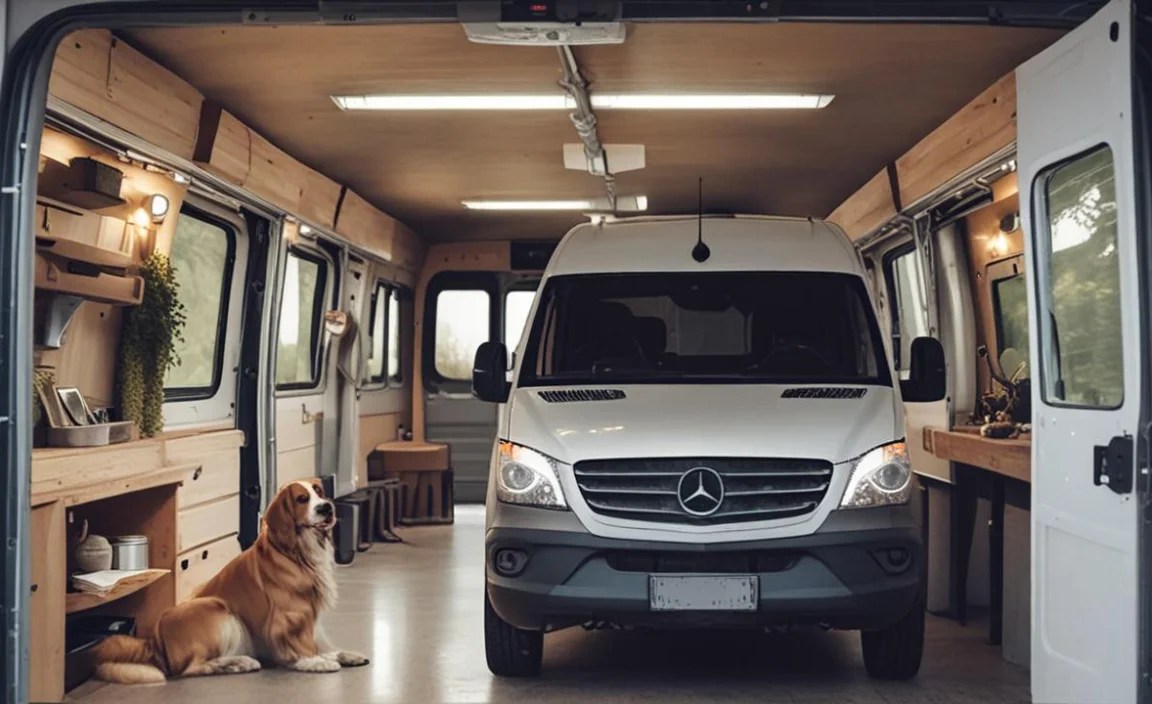
Taking your beloved pets along for the ride in your Mercedes Sprinter van can be incredibly rewarding. Whether you’re embarking on cross-country road trips, hitting the trails for a weekend escape, or simply enjoying a day out, your Sprinter can become their very own mobile home. However, a standard van isn’t always ideal for our four-legged companions. Thankfully, with the right modifications, you can create a space that is both functional for you and supremely comfortable and safe for your pets. This guide will walk you through essential pet-friendly upgrades for your Mercedes Sprinter van, making every journey a tail-wagging success.
It’s a common desire for pet owners to want to share their adventures with their furry family members. Yet, many find their standard vehicles aren’t quite up to the task of accommodating their pets comfortably and safely. Concerns about durability, cleanliness, and security can arise. Don’t worry; we’ve got you covered. Here, we’ll explore how to transform your Sprinter into a haven for your pets, ensuring their well-being and your peace of mind. Get ready to discover the ultimate pet-friendly modifications that will make your Sprinter van the perfect travel companion for you and your best friend.
Why Modify Your Mercedes Sprinter for Pets?

Your Mercedes Sprinter van is a versatile platform, perfect for adventures. When those adventures involve pets, certain considerations come into play that a standard setup might not address. Modifying your Sprinter allows you to prioritize your pet’s safety, comfort, and well-being, while also protecting your van’s interior from wear and tear. It’s about enhancing the travel experience for everyone involved.
Think about it: the typical flooring might not be slip-resistant, the seating could be easily damaged, and ensuring proper ventilation and temperature control for a pet can be challenging. Pet-friendly modifications address these specific needs, turning potential problem areas into well-designed solutions. This not only makes travel more enjoyable but also helps maintain your Sprinter’s resale value by keeping the interior in top condition.
Key Pet-Friendly Modifications for Your Sprinter Van

When planning modifications, it’s crucial to think about your pet’s specific needs and your travel style. Some pets need more space, while others are prone to overheating. Here are the most impactful modifications to consider:
1. Durable and Easy-to-Clean Flooring
This is perhaps the most critical modification for any pet-friendly vehicle. Dog paws, with their nails and potential for shedding, can quickly wear down standard carpeting or laminate. Moreover, accidents happen, and you need flooring that can withstand them without permanent damage or lingering odors.
Why It Matters:
- Durability: Resists scratches and wear from claws.
- Traction: Prevents slips, especially for older pets or during sudden stops.
- Water Resistance: Protects the underlying subfloor from moisture and spills.
- Easy Cleaning: Simplifies cleanup of mud, fur, and accidents.
Material Options:
- Vinyl Plank Flooring (LVP): A popular choice for its durability, water resistance, and excellent traction. It comes in various styles that can mimic wood or tile. Look for commercial-grade options for maximum resilience.
- Rubber Flooring: Similar to what you find in gyms or commercial kitchens, rubber flooring offers superior grip and is incredibly easy to clean. It’s also shock-absorbent, which can be beneficial for older or less agile pets. Check out resources on durable flooring for high-traffic areas, which can offer insights into commercial-grade materials suitable for vans.
- Linoleum: A more budget-friendly option that is water-resistant and easy to wipe down. Ensure it’s a good quality, seamless installation to prevent moisture seeping underneath.
Installation Tip: Consider a floating floor system or direct adhesive application. For LVP, many systems click-lock, making installation straightforward. Rubber flooring might require a strong adhesive specific for automotive applications.
2. Secure and Comfortable Pet Sleeping Areas
Your pet needs a safe and designated spot to rest and feel secure, especially when traveling. This could range from a simple raised platform to a custom-built crate system.
Elevated Pet Beds/Platforms:
Elevating your pet’s resting area off the floor can provide several benefits. It keeps them away from the coldest part of the floor in winter and the hottest in summer, and it can also prevent them from wandering into other parts of the van unsupervised.
- Materials: Use plywood or strong composite boards for the base, covered with a comfortable, washable cushion. Ensure all edges are sanded smooth to prevent splinters.
- Design: Consider built-in storage underneath the platform for toys, leashes, and food bowls.
Custom-Built Crates or Kennels:
For pets that are crate-trained or need an extra layer of security, a custom-built kennel integrated into your van’s layout is ideal. This can be designed to fit seamlessly with your other van build elements.
- Ventilation: Crucial for any enclosed crate. Ensure there are plenty of openings or consider adding small fan vents.
- Material: Plywood is common, but ensure it’s sealed to prevent moisture absorption. Metal grates are also an option for maximum airflow.
- Access: Design doors that are easy to open and close securely.
Safety Note: Always ensure any sleeping area is well-ventilated and not directly exposed to extreme heat or cold. Never leave pets unattended in a hot vehicle, even with ventilation.
3. Climate Control and Ventilation Solutions
Maintaining a comfortable temperature is paramount for your pet’s health and safety, especially during warmer months or in transitional weather. Adequate ventilation ensures fresh air circulation and helps manage odors.
Ventilation Options:
- Roof Vent Fan: A Maxxair Fan or similar is an essential upgrade. These fans can be set to intake fresh air or exhaust stale air, and many have rain sensors and remote controls. This is vital for keeping the van cool and aired out. Consult resources on proper RV ventilation for best practices.
- Window Screens/Vent Guards: Simple but effective. Screens keep bugs out while allowing windows to be open for airflow. Vent guards offer a more permanent solution for opening windows without compromising security.
- Passive Vents: Small, strategically placed vents can aid in continuous airflow without needing power.
Temperature Monitoring:
A simple digital thermometer with a probe that can be placed in your pet’s area will help you keep a close eye on the temperature. This is especially important if you’re running an air conditioner or heater that might not reach all corners of the van.
4. Secure Harness and Leash Anchors
Safety during transit is a huge concern. Loose pets can be a distraction, and in the event of a sudden stop or accident, they can be thrown around the cabin.
Anchor Points:
Install sturdy anchor points directly into the Sprinter’s frame or robust structural components. Avoid anchoring solely to cabinetry or lightweight panels.
- Material: Stainless steel or heavy-duty carabiner-style clips can be attached to reinforced eye bolts.
- Placement: Strategically locate anchors where your pet typically rides, ensuring their leash or harness tether won’t allow them to reach dangerous areas like the driver’s pedals.
Research: Look for automotive-grade tie-down anchors. Resources on securing cargo in vans can often guide you to robust fastening solutions suitable for moderate to high stress.
5. Pet-Proofing Your Van’s Interior
While some pets are perfectly behaved, others might be tempted to chew or scratch. Protecting your van’s existing surfaces is key to maintaining its condition.
Seat Covers and Mats:
Invest in heavy-duty, waterproof seat covers for your existing seats. These protect against fur, dirt, scratches, and moisture. Similarly, protective mats for floors and cargo areas are a must.
- Materials: Look for canvas, neoprene, or vinyl-backed materials known for their durability and water resistance.
Protective Film/Panels:
For areas prone to intense scratching, like door panels or rear bulkheads, consider applying protective films or thin, durable panels (e.g., plastic sheeting or aluminum). These are easily replaceable if damaged.
6. Access to Fresh Water and Food
Keeping your pet hydrated and fed on the go is essential. Consider how you will manage this within your van layout.
Integrated Water Systems:
While a full plumbing system might be overkill, a simple, secure water dispenser can prevent spills. Look for spill-proof travel bowls or dispensers.
Dedicated Food Storage:
Designate a cabinet or drawer for pet food to keep it dry and secure. Airtight containers will help maintain freshness and prevent pests.
7. Waste Management Solutions
Dealing with pet waste on the road is a reality. Having a plan and the right supplies will make this aspect of travel much smoother.
- Designated Bin: Keep a small, odor-controlled trash bin specifically for pet waste.
- Cleaning Supplies: Store pet-safe cleaning sprays and paper towels in an easily accessible location.
- Portable Potty Solution: For urban areas or during travel, consider a portable potty pad or a foldable relief station.
Planning Your Mercedes Sprinter Pet Modifications: A Checklist

Before you start cutting or screwing, it’s wise to have a plan. This will ensure your modifications are cohesive, functional, and safe for both you and your pet.
Step-by-Step Approach
- Assess Your Pet’s Needs: Size, temperament, activity level, and any special requirements (e.g., older pet, anxiety).
- Define Your Travel Style: Weekend trips, long-term travel, camping, city exploration?
- Budget: Determine how much you’re willing to spend. Some modifications are DIY-friendly, while others might require professional installation.
- Prioritize: Start with the most critical safety and comfort features (flooring, ventilation, secure anchors).
- Layout Design: Sketch out where each modification will go. Consider workflow and how you’ll use the rest of the van.
- Material Selection: Choose durable, pet-safe, and easy-to-clean materials.
- Installation: DIY or hire professionals. Ensure all work is done safely and to a high standard.
- Testing: Take your pet on a short trip to test out the new modifications and make any necessary adjustments.
Budgeting and Material Costs

The cost of pet-friendly modifications can vary widely depending on the extent of the changes and the materials you choose. Here’s a general idea of costs:
| Modification Category | Estimated Cost Range (USD) | Notes |
|---|---|---|
| Flooring (LVP or Rubber) | $300 – $1,200 | Includes material for a standard Sprinter. Professional installation is extra. DIY can save significantly. |
| Roof Vent Fan | $150 – $400 | Material cost. Installation complexity can add to labor costs. |
| Pet Bed/Platform | $50 – $500 | DIY is cost-effective. Custom built-ins will be more expensive. |
| Seat Covers & Mats | $100 – $400 | For front and/or rear seats. Quality varies greatly. |
| Secure Anchor Points | $20 – $150 | For hardware. Professional installation for frame anchoring is recommended. |
| Pet-Proofing Panels/Film | $50 – $200 | Depending on the area covered and material used. |
DIY vs. Professional Installation
Many basic modifications, like installing LVP flooring or a pet platform, are achievable for those with some DIY experience. However, more complex tasks such as installing a roof vent fan or securely anchoring points into the van’s frame might be better left to professionals to ensure safety and structural integrity.
When hiring professionals, ensure they have experience with van conversions or automotive interiors. For anchor points, always verify their ability to properly secure them to the vehicle’s chassis. Resources like the National Highway Traffic Safety Administration (NHTSA) provide guidelines on vehicle safety that are relevant when considering structural modifications.
Maintaining Your Pet-Friendly Sprinter
Once your Sprinter is transformed, regular maintenance will keep it and your pet comfortable and safe.
- Daily: Quick sweep of fur, check water levels.
- Weekly: Deeper clean of floors, wipe down surfaces, wash pet bedding.
- Monthly: Inspect flooring for wear or damage, check ventilation systems, deep clean any pet resting areas.
- As Needed: Groom your pet regularly to minimize shedding.
Keeping cleaning supplies, such as pet-safe deodorizers and stain removers, readily accessible will make maintenance much easier. Remember to also maintain your pet’s gear, like leashes, harnesses, and travel bowls.
Frequently Asked Questions (FAQ)
Q1: What is the most important modification for a pet-friendly Sprinter van?
A1: Durable, easy-to-clean, and slip-resistant flooring is the most crucial modification. It protects your van’s interior and ensures your pet’s safety and comfort.
Q2: Are there any specific safety concerns when modifying a Sprinter for pets?
A2: Yes, always prioritize ventilation to prevent overheating, ensure secure anchor points for leashes/harnesses, and avoid sharp edges or toxic materials in areas accessible to pets.
Q3: How can I keep my Sprinter cool for my pet in hot weather?
A3: Install a roof vent fan, ensure good passive ventilation, use window screens, and consider a portable fan. Never leave your pet unattended in a hot vehicle.
Q4: Can I use my existing Sprinter seats for my dog?
A4: Yes, but always use high-quality, waterproof seat covers to protect them from fur, dirt, and potential damage. Secure your dog with a harness and tether to an anchor point.
Q5: What kind of flooring is best for dogs in a van?
A5: Vinyl plank flooring (LVP) or rubber flooring are excellent choices due to their durability, water resistance, and traction, which helps prevent slips.
Q6: How do I handle pet odors in my Sprinter van?
A6: Regular cleaning, good ventilation (especially a roof fan), and using pet-safe odor neutralizers are key. Sealing your flooring properly also helps prevent odors from sinking into the subfloor.
Q7: Where can I find resources for van conversion materials?
A7: Many online retailers specialize in RV and van conversion supplies, offering flooring, ventilation, and hardware. Reputable automotive supply stores also carry durable mats and seat covers. For general construction and material durability, references from sites like the FEMA flood protection section can highlight resilient material properties.
Conclusion
Transforming your Mercedes Sprinter van into a pet-friendly haven is a rewarding endeavor that enhances your travel experience. By carefully considering modifications like durable flooring, secure sleeping areas, efficient climate control, and robust safety anchors, you create a space where your beloved companion can travel in comfort and safety.
Remember, the best modifications are those that suit your pet’s specific needs and your travel lifestyle. Whether you opt for a few simple upgrades or a comprehensive build-out, your Sprinter can become the ultimate adventure vehicle for you and your furry best friend. Happy travels!


