Mercedes S Class Engine Bay Cleaning: Ultimate Effortless Shine
Effortlessly restore the pristine look of your Mercedes S Class engine bay with a simple, step-by-step cleaning process. This guide covers essential tools, safe techniques, and finishing touches for that ultimate shine, even for beginners.
Your Mercedes-Benz S-Class is a masterpiece of engineering and luxury. Like any fine automobile, keeping its engine bay clean not only enhances its aesthetics but can also reveal potential issues early. For many owners, the thought of cleaning complex under-hood components can feel daunting. However, with the right approach, achieving a showroom-worthy engine bay is entirely within reach, even if you’re new to car detailing. This guide will break down the process into easy-to-follow steps, ensuring your S-Class’s heart gleams as impressively as its exterior. Let’s dive in and discover how to make your engine bay shine with minimal effort.
Frequently Asked Questions
Is cleaning your Mercedes S Class engine bay necessary?
Yes, absolutely. Regular cleaning helps you spot leaks or worn parts, keeps components cooler by removing insulating dirt, and maintains the car’s overall value and appearance. A clean engine bay speaks volumes about how well you care for your vehicle.
How often should I clean my S Class engine bay?
Generally, once or twice a year is sufficient for most owners. If you drive in dusty or harsh conditions, or if you notice significant dirt buildup, more frequent cleaning might be beneficial. Always inspect your engine bay before deciding if it’s time for a clean.
What should I avoid when cleaning my Mercedes S Class engine bay?
Avoid using high-pressure washers directly on sensitive electrical components, porous plastics, or seals. Also, steer clear of harsh degreasers that could damage rubber and plastic parts, and never clean a hot engine as thermal shock can cause damage.
Can water damage my Mercedes S Class engine?
While excessive water sprayed directly onto electrical connectors, the alternator, or the fuse box can cause issues, a carefully managed cleaning process using appropriate techniques and protection is generally safe. The key is controlled application and ensuring areas are dry afterwards.
What are the best products for cleaning a Mercedes S Class engine bay?
Look for pH-neutral engine degreasers, dedicated interior protectants (which work well on plastic and rubber under the hood), detailing brushes of various sizes, microfiber towels, and a good quality detail spray for finishing. Always check product compatibility for automotive use.
Do I need to disconnect the battery before cleaning?
It’s a recommended safety precaution, especially if you’re using a lot of water or cleaning near electrical components. Disconnecting the negative terminal of the battery prevents accidental shorts and protects the vehicle’s sensitive electronics.
How long does it take to clean an engine bay?
For a beginner following a step-by-step guide, expect it to take anywhere from 1 to 3 hours. Experienced detailers can often do it faster, but rushing can lead to mistakes. Patience is key for a thorough and safe clean.
Why Cleaning Your S Class Engine Bay Matters

Your Mercedes-Benz S-Class is more than just a car; it’s a statement of luxury, performance, and meticulous German engineering. While the exterior often receives the spotlight, the engine bay is its operational heart. Keeping this area clean offers several significant benefits:
- Easier Maintenance and Diagnostics: A clean engine bay makes it significantly simpler to spot fluid leaks (oil, coolant, brake fluid), worn belts, cracked hoses, or any other issues that might require attention. This proactive approach can save you from costly repairs down the line.
- Improved Cooling Efficiency: Dust, grime, and debris can accumulate on engine components and radiators, acting as an insulator. Removing this buildup allows the engine to dissipate heat more effectively, potentially improving its performance and longevity.
- Preservation of Components: Over time, dirt and road salt can contribute to corrosion and degradation of rubber, plastic, and metal parts within the engine bay. Regular cleaning helps protect these sensitive components.
- Enhanced Resale Value: A meticulously maintained engine bay signals to potential buyers that the vehicle has been well cared for, significantly boosting its appeal and market value.
- Pride of Ownership: For many Mercedes-Benz enthusiasts, the satisfaction of knowing every inch of their car is immaculate, including the often-hidden engine bay, is a reward in itself.
While professional detailing services offer this as an option, understanding how to do it yourself can be incredibly rewarding and cost-effective. This guide is designed to empower you with the knowledge and steps to achieve an “ultimate effortless shine” for your S-Class.
Step 1: Gather Your Tools and Supplies

Before you begin, assembling the right arsenal of tools and cleaning agents is crucial for an effective and safe engine bay clean. Using the wrong products or tools can inadvertently cause damage. Here’s what you’ll need:
Essential Tools:
- Stiff Bristle Brushes: A variety of sizes, including a long-handled one for hard-to-reach areas, and smaller detail brushes for intricate parts. For engine bay cleaning specifically, natural bristle or nylon brushes are preferred over metal ones to avoid scratching.
- Microfiber Towels: Plenty of them. You’ll use these for wiping down surfaces, drying components, and applying protectants. Opt for high-GSM (grams per square meter) towels for better absorbency and less scratching.
- Plastic Bags or Wrap and Painter’s Tape: To protect sensitive engine components like the alternator, air intake, fuse box, and any exposed electrical connectors from water.
- Gloves: Nitrile or latex gloves to protect your hands from grease, grime, and cleaning chemicals.
- Safety Glasses: Essential to protect your eyes from splashes of cleaning solutions or debris.
- Bucket(s): At least one, preferably two (one for soapy water, one for rinsing).
- Garden Hose with Adjustable Nozzle: A gentle stream of water is all you need; avoid high-pressure settings.
Recommended Cleaning Agents:
- pH-Neutral All-Purpose Cleaner (APC) or Engine Degreaser: Look for products specifically designed for automotive use and safe for plastics, rubber, and painted surfaces. A pH-neutral formula is vital to avoid degrading materials. Brands like Griot’s Garage offer reliable options.
- Detailing Spray or Quick Detailer: For light cleaning and adding a final shine after the main wash.
- Plastic and Rubber Protectant/Dresser: Water-based formulas are often preferred as they don’t attract dust as much as silicone-based ones and provide a natural, non-greasy finish.
- Optional: Citrus-based Pre-wash or Foam Cannon: For heavily soiled areas, these can help break down grease and grime before the main wash.
Step 2: Essential Safety and Preparation

Safety isn’t just a suggestion; it’s paramount when working on any vehicle, especially a sophisticated machine like the S-Class. Proper preparation ensures both your well-being and the protection of your car’s delicate components. This is the most critical phase before any cleaning begins.
Ensure a Cool Engine
Never attempt to clean a hot engine. The extreme temperature difference can cause components to crack or warp due to thermal shock, and cleaning products could evaporate too quickly, leaving streaks or residue. Allow the engine to cool completely, preferably for at least 1-2 hours after driving, or ideally, clean it when the car has been parked overnight.
Disconnect the Battery (Recommended)
For maximum safety, especially if you’re concerned about water ingress into electrical systems, it’s wise to disconnect the battery. Locate the battery (often in the trunk or under the rear seat in modern S-Classes) and disconnect the negative terminal first. This prevents accidental short circuits.
Protect Sensitive Components
This step is crucial to prevent water damage to vital electronic parts. Carefully cover the following with plastic bags or wrap and secure them with painter’s tape:
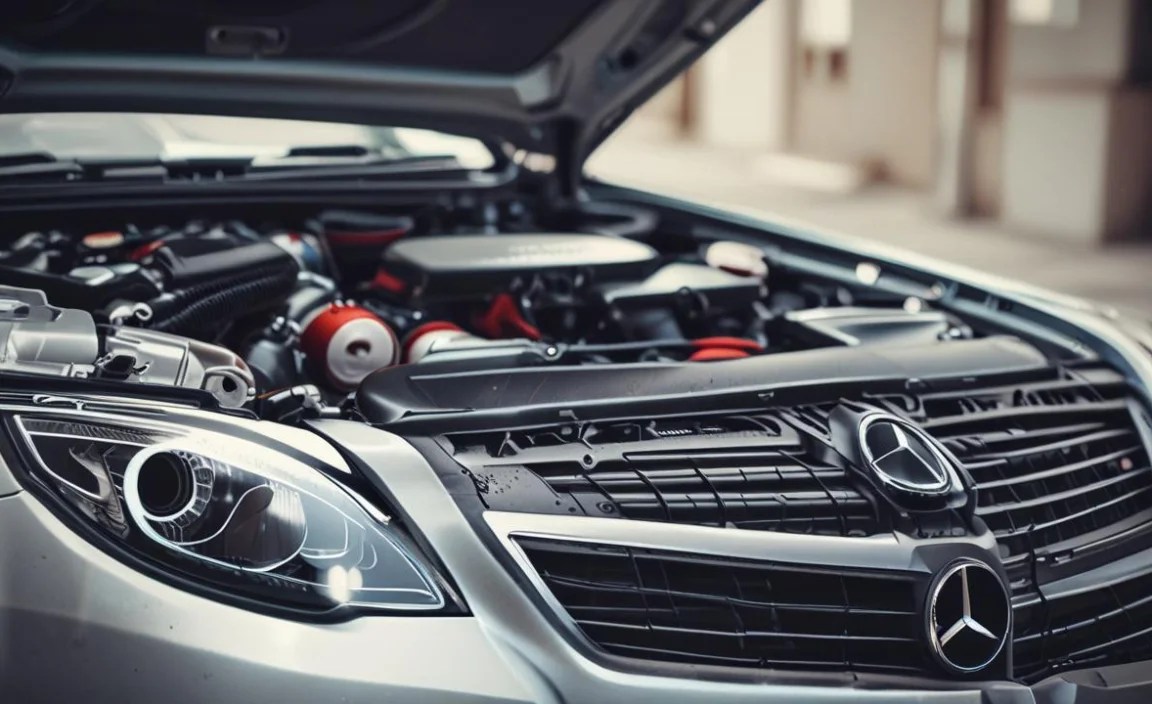
- Alternator: Usually a cylindrical component with fins.
- Air Intake/Filter Box: The opening where the engine draws air.
- Fuse Box and Relay Modules: Often black plastic boxes with covers.
- ECU (Engine Control Unit): If visible and accessible.
- Exposed Electrical Connectors: Look for any unplugged or loosely covered wiring harnesses.
- Engine Fans: To prevent water from being forced directly into the motor.
Carefully shield sensitive electrical parts from direct water contact.
Ensure the material is sealed tightly to prevent water from seeping underneath. Remember to remove these coverings thoroughly once the cleaning is complete.
Step 3: The Cleaning Process
With all precautions taken, it’s time to bring out the grime. This stage focuses on safely removing dirt, grease, and buildup. Work from top to bottom to allow gravity to assist in washing away loosened contaminants.
Pre-Rinse (Optional but Recommended)
Using your garden hose on a gentle spray setting, lightly rinse the engine bay. This removes loose dirt and dust, giving you a clearer picture of the areas that need more intensive cleaning. Avoid spraying directly at protected components.
Apply Cleaning Agent
Generously spray your chosen pH-neutral all-purpose cleaner or engine degreaser onto the dirty surfaces. Focus on areas with heavy grease and grime. Let the product dwell for the time recommended by the manufacturer (usually 2-5 minutes) to allow it to break down the contaminants. Do not let it dry on the surface.
Agitate for Stubborn Grime
This is where your brushes come into play. Use your larger brush for broad areas like the engine cover, valve covers, and firewall. Employ smaller detail brushes to get into crevices, around hoses, and on intricate components. Gently scrub all soiled areas. If using a foam cannon, apply foam and let it dwell before agitation.
For very stubborn, baked-on grease, you might need a dedicated engine degreaser. Ensure it’s safe for your S-Class’s materials. After applying, let it sit for a few minutes before agitating. Remember, excessive force can damage components, so be methodical and gentle.
Gentle agitation with brushes lifts embedded dirt and grime.
Rinse Thoroughly
Once you’ve agitated all the dirty areas, rinse the engine bay thoroughly using the garden hose on a low-pressure, wide-spray setting. Start from the top and work your way down, ensuring all cleaning product residue and loosened grime are flushed away. Pay close attention to rinsing away any foam or suds. Again, avoid direct, high-pressure spraying on electrical components, even if they are covered.
Step 4: Drying and Detailing

Thorough drying is just as important as cleaning. Lingering moisture can lead to corrosion or electrical issues. This step also involves bringing out the shine and protecting surfaces.
Initial Drying
Use compressed air (if available) to blow water out of crevices, vents, and around connectors. If you don’t have compressed air, use your microfiber towels. Start by gently patting down larger surfaces. Then, meticulously use towels to dry hoses, plastic covers, metal components, and around any parts you protected earlier. Don’t forget to dry the underside of the hood.
Remove Protections
Carefully remove all the plastic bags, wrap, and tape you applied in the preparation stage. Inspect these areas to ensure they are completely dry. If any moisture remains, use a dry microfiber towel or compressed air to remove it.
Apply Protectant and Shine
Once everything is dry, it’s time to give your engine bay that final, impressive shine. Apply a water-based plastic and rubber protectant to hoses, plastic covers, trim pieces, and rubber seals. Spray a small amount onto a microfiber applicator pad or towel, and then wipe down the surfaces. This not only enhances the appearance, giving a deep, satin finish, but also conditions the materials, protecting them from future drying and cracking.
For a final touch and to add a layer of gloss, you can lightly mist a clean microfiber towel with a quality detailing spray or quick detailer and wipe down painted surfaces, plastic covers, and even some polished metal components. This removes any water spots and adds a layer of protection against dust and dirt.
Protectants restore color and safeguard plastic and rubber parts.
Final Inspection
Walk around the engine bay and perform a final visual inspection. Ensure all components look clean and protected. Make sure no cleaning residue has been left behind and that all protective coverings have been removed.
Specific Considerations for the Mercedes S-Class
The S-Class, being at the pinnacle of Mercedes-Benz luxury and technology, often features more complex and integrated engine layouts than standard vehicles. While the general cleaning principles remain the same, here are a few points to keep in mind:
Complex Engine Covers
Modern S-Class models often have extensive plastic engine covers designed for noise reduction and aesthetics. These can sometimes trap heat and moisture. While they are typically safe to clean with APC and water, avoid soaking them excessively. Agitate gently with a soft brush and dry thoroughly. These covers are often the most visible part, so a good clean here makes a big difference.
Advanced Electrical Systems
Mercedes-Benz vehicles are packed with sophisticated electronics. Be extra vigilant when protecting components like the Engine Control Unit (ECU), various sensors, and the extensive wiring harnesses. If you’re unsure about a component, it’s always better to err on the side of caution and give it extra protection or skip it if access is difficult and risky.
Performance Variants (AMG)
If your S-Class is an AMG model, you might have exposed performance components, larger intercoolers, or additional cooling systems. These areas might accumulate more debris due to their performance-oriented design. Be sure to clean these components thoroughly but gently. For intercoolers, ensure you’re not spraying them with high pressure, as this could bend the delicate fins.
Material Quality
The S-Class uses high-quality materials throughout. This means most plastics and rubber components are designed for durability. However, using overly aggressive chemicals can still degrade them over time. Always stick to pH-neutral cleaners and dedicated automotive protectants. For painted engine bay components or the underside of the hood, after cleaning and drying, a spray wax or sealant can add an extra layer of gloss and protection.
How Often Should You Clean Your S Class Engine Bay?
For the average S-Class owner who primarily uses their vehicle for daily commuting and occasional longer trips, cleaning the engine bay once or twice a year is typically sufficient. This usually aligns with seasonal detailing tasks, perhaps in late spring after winter road salt has been washed away, and again in the fall before winter sets in.
<


