SL-Class Memory Seat Settings: Ultimate Perfect Ride
SL-Class Memory Seat Settings: Your Ultimate Perfect Ride Guide
Unlock your Mercedes-Benz SL-Class’s perfect driving position with easy-to-follow memory seat settings. This guide shows you how to set, save, and recall your ideal seat, mirror, and steering wheel configurations in minutes, ensuring every drive is personalized for ultimate comfort and control. Discover how to tailor your SL to fit you like a glove.
Getting into your Mercedes-Benz SL-Class should feel like stepping into your personal sanctuary. The plush leather, the precise controls, and that unmistakable Mercedes-Benz refinement—it all comes together when the car is perfectly adjusted for you. One of the most significant contributors to this bespoke driving experience is the memory seat system. Yet, many owners treat it as a mystery, fumbling with buttons or settling for “good enough” positions. Don’t let that be you! This guide will demystify your SL-Class’s memory seat settings, turning a potentially frustrating adjustment process into a simple, repeatable action. We’ll walk through how to set it up, save your preferences, and recall them effortlessly, ensuring your ultimate perfect ride is just a button press away.
Why Memory Seats Are Your SL-Class’s Secret Weapon

Your Mercedes-Benz SL-Class is engineered for sophistication and performance, and that extends to its interior ergonomics. The memory seat function isn’t just a luxury; it’s a sophisticated system designed to:
Enhance Comfort: A perfectly positioned seat reduces strain on your back, neck, and legs, making even the longest drives feel more enjoyable.
Improve Control: Proper seating posture allows for optimal reach to the steering wheel and pedals, enhancing your connection to the road and improving reaction times.
Save Time: No more fiddling with multiple buttons every time you get into the car. Your ideal position is instantly recalled.
Personalize for Multiple Drivers: If your SL is shared, each driver can preset their preferred settings, eliminating tedious adjustments.
Maintain Body Alignment: Consistent, correct posture can contribute to better spinal alignment and long-term driving comfort by preventing the development of poor driving habits.
Understanding the Components: What Moves and Remembers?
The memory seat system in your SL-Class typically controls several key adjustments. While specific features can vary slightly depending on the model year and trim, you can expect these primary components to be part of the memory function:
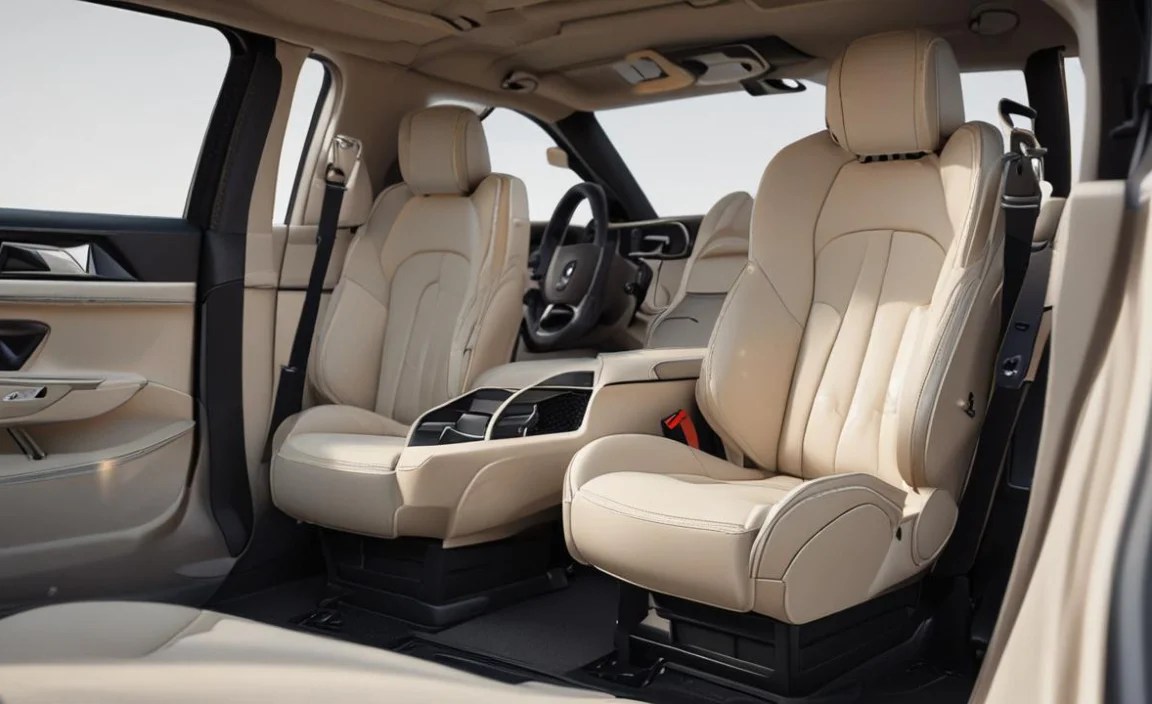
Seat Position: This includes fore/aft movement (sliding forward/backward), seatback angle (recline), and seat height.
Seat Cushion Depth and Angle: Many models offer adjustments for how much thigh support you get and the tilt of the seat cushion.
Lumbar Support: Adjustable bolstering for your lower back.
Headrest Position: While not always part of the primary memory, some systems integrate headrest adjustments.
Exterior Mirrors: The system can often store your preferred mirror angles, crucial for visibility and safety.
Steering Wheel Position: The steering column’s height and reach can be adjusted and saved.
These elements work in harmony to create a truly personalized cockpit.
Setting Up Your Perfect Driving Position: A Step-by-Step Guide

The process of setting your memory seat is straightforward but requires a methodical approach to ensure you capture your ideal configuration accurately. Follow these steps on a flat surface with the engine running or the ignition in the “on” position.
Step 1: Prepare Your Vehicle
Engine or Ignition: Start the engine or turn the ignition to the “on” position. This ensures all electronic seat and mirror adjustments are powered.
Clear the Area: Make sure the floor around the seat is clear of any obstructions that might interfere with the seat’s movement.
Step 2: Adjust the Seat for Optimal Comfort and Control
This is the most critical phase. You want to achieve a position that balances comfort with your ability to operate the vehicle safely and effectively.
Seat Height: Adjust the seat height so your thighs are comfortably supported, and you have good headroom. You should be able to see the entire dashboard and road ahead without straining. Aim for a slight bend in your knees.
Seat Fore/Aft: Slide the seat forward or backward until your knees are slightly bent when your feet are resting on the pedals. Ensure you can fully depress the brake pedal comfortably.
Seatback Angle: Adjust the seatback so your arms are slightly bent when holding the steering wheel at its top. This prevents overreaching and allows for better control. Your back should be comfortably supported against the seatback.
Seat Cushion (Depth and Angle): If your SL has these functions, adjust the seat cushion depth so there’s a few fingers’ width between the edge of the cushion and the back of your knees. Adjust the angle to provide comfortable thigh support without putting pressure on your hamstrings.
Lumbar Support: Adjust the lumbar support to fill the natural curve of your lower back. This is crucial for preventing fatigue on longer drives.
Headrest: Ensure the headrest is positioned so the top is roughly level with the top of your head, and it’s close enough to support your head comfortably.
External authoritative link: For more in-depth information on driving ergonomics and posture, you can refer to resources from organizations like the National Highway Traffic Safety Administration (NHTSA), which provides valuable insights into vehicle safety and driver positioning. While focused on child seats, their principles highlight the importance of correct occupant positioning.
Step 3: Adjust Mirrors for Maximum Visibility
With your seat in its perfect position, it’s time to set your mirrors. Good mirror adjustment is vital for situational awareness and safe driving.
Rearview Mirror: Adjust the interior rearview mirror so you can see as much of the rear window as possible without having to crane your neck.
Side Mirrors: Adjust the driver’s side mirror so you can just barely see the side of your own vehicle. Then, adjust the passenger’s side mirror so you can just barely see the side of your vehicle. This technique minimizes blind spots. Many SL models have auto-dimming and power-folding mirrors, which are usually integrated into the memory functions.
Step 4: Adjust the Steering Wheel
The steering wheel should complement your seating position.
Height and Reach: Adjust the steering wheel so it’s at a comfortable height and distance from your chest. With your arms extended, your wrists should rest on the top of the steering wheel, with a slight bend in your elbows. This allows for easy steering inputs without strain.
Step 5: Save Your Preferences to a Memory Position
Now that you have your ideal position dialed in, it’s time to store it.
1. Locate the Memory Buttons: The memory seat buttons are typically found on the driver’s door panel, often near the door handle and window controls. You’ll see buttons labeled “1,” “2,” and sometimes “3” (for additional drivers or configurations) and a “SET” or “S” button.
2. Press the “SET” Button: Press and hold the “SET” button. You might hear a chime or see a light flash, indicating the system is ready to record.
3. Press Your Desired Memory Button: While still holding “SET,” immediately press and hold your chosen memory button (e.g., “1”) until you hear another chime or see a light confirm the setting has been saved.
Example: To save your primary driving position to Button 1:
Press and hold the “SET” button.
While holding “SET,” press and hold Button “1.”
Release both buttons when you hear the confirmation chime.
Important Note: You must press “SET” first, followed by the desired memory button. Releasing either button too early will abort the save process.
Step 6: Test Your Saved Setting
It’s always a good idea to quickly test if your setting was saved correctly.
1. Move the Seat: Manually move the seat forward or backward, recline the seatback, or adjust the steering wheel slightly away from your saved position.
2. Recall the Setting: Press and hold your chosen memory button (e.g., Button “1”). The seat, mirrors, and steering wheel should automatically move to the exact position you saved. Release the button once the movement stops.
If the seat doesn’t move to the saved position, repeat Step 5 to re-save your configuration.
Recalling Your Seat Memory: Effortless Customization
Once your memory settings are saved, recalling them is incredibly simple and quick.
How to Recall a Saved Position
1. Ensure Car is Ready: Make sure the engine is running or the ignition is in the “on” position.
2. Press and Hold: Press and hold the desired memory button (1, 2, or 3).
3. Automatic Adjustment: The seat, exterior mirrors, and steering wheel will automatically adjust to the stored position.
4. Release Button: Release the button once all adjustments are complete.
Most SL models also offer an “easy exit” or “easy entry” feature. This often automatically moves the seat back and steering wheel forward when you open the driver’s door with the engine off and the transmission in “Park.” Check your owner’s manual for specific details on how to activate and configure this feature, as it can also be linked to your memory settings.
Advanced Memory Seat Features and Tips

Your SL-Class memory seats might offer more than just basic position recall. Explore these possibilities to maximize your experience.
Linking Settings to Key Fob
Many Mercedes-Benz vehicles allow you to link specific memory seat positions to your key fob. This means when you unlock the car with a particular key fob, it automatically recalls the associated memory setting (e.g., Key Fob 1 recalls Memory 1).
How to Link: This is typically done through the vehicle’s infotainment system (COMAND or MBUX). Navigate to the vehicle settings, then to seat or door configurations, and associate a memory button with your key fob. Refer to your owner’s manual for the exact menu path for your model year.
Saving Mirror Positions
As mentioned, mirror positions are usually saved along with your seat settings. This is incredibly convenient, especially if your SL is used by multiple drivers or if you have a car wash that requires mirrors to be folded (which then resets their position).
Adjusting Without Saving
You can always manually adjust your seat and other components without affecting your saved memory positions. Simply use the controls as you normally would. If you want to update a saved position, you’ll need to repeat the “SET” + Memory Button process.
Troubleshooting Common Issues
Seat Not Moving:
Ignition: Ensure the ignition is in the “on” position or the engine is running.
Obstructions: Check for anything physically blocking the seat tracks.
Fuse: In rare cases, a blown fuse might be the issue. Consult your owner’s manual for fuse box locations and relevant fuses.
Setting Not Saving:
“SET” Button Sequence: Double-check that you are pressing and holding “SET” first, then the memory button, and holding both until confirmation.
Power Interruption: If the vehicle’s battery was recently disconnected, you might need to re-initialize the system.
Mercedes-Benz SL Memory Seat Control Locations
| Component | Typical Location |
| :——————- | :——————————————————————– |
| Seat Adjustment Controls | Bottom bolster of the driver’s seat (looks like a miniature seat) |
| Memory Buttons | Driver’s door panel, usually near door handle and window controls |
| “SET” Button | Within the bank of memory buttons on the driver’s door panel |
| Mirror Adjustment | Often on the driver’s door panel, a separate joystick-like control |
| Steering Wheel | Lever located under the steering column at the driver’s left |
Understanding SL-Class Seat Adjustments: A Comparison

Different SL-Class generations offer varying levels of seat sophistication. Here’s a general overview of how advanced features might differ, impacting your memory seat setup:
| Feature | Early SL Generations (e.g., R129) | Mid-Generation SL (e.g., R230) | Latest SL Generations (e.g., R231, R232) |
| :—————————- | :——————————– | :—————————– | :————————————— |
| Basic Seat Movement | Fore/Aft, Height, Recline | Fore/Aft, Height, Recline, Lumbar | Fore/Aft, Height, Recline, Lumbar, Cushion Depth, Cushion Angle |
| Memory Functions | Seats, Mirrors | Seats, Mirrors, Steering Wheel | Seats, Mirrors, Steering Wheel, Lumbar, Cushion Adjustments |
| Key Fob Integration | Less Common / None | Common | Standard, often with multiple profiles |
| “Easy Exit/Entry” Feature | Less Common / Manual | Often available | Standard, often highly configurable |
| Massage/Ventilation | Rare | Available on higher trims | Widely available, often integrated into memory |
| Active Bolsters | Rare | Available on higher trims | Common, can include dynamic adjustments |
Note: This table provides a general guide. Always refer to your specific SL-Class owner’s manual for precise details on the features available in your vehicle. For example, advanced climate control seats with massage functions are a prime example of luxury features that benefit immensely from being part of the memory seat profile.
*
Conclusion: Your Perfectly Tailored SL Awaits
The memory seat settings in your Mercedes-Benz SL-Class are more than just a convenience; they are the cornerstone of a truly personalized and enjoyable driving experience. By taking a few minutes to properly set, save, and understand your memory positions, you unlock a level of comfort and control that elevates every journey. Whether you’re commuting, embarking on a road trip, or enjoying a spirited drive on winding roads, your perfectly tailored driving position will ensure you feel connected, comfortable, and confident. So, take the time to dial in your ideal settings, save them to your preferred memory slot, and experience the ultimate perfect ride in your SL-Class. It’s an adjustment that pays dividends with every mile.
***
Frequently Asked Questions (FAQ)
Q1: How do I reset my SL-Class memory seat settings if they get messed up?
A1: To reset, you typically need to set each memory position again. Some models might have a specific reset procedure involving holding buttons for an extended period, but the most common way is to simply overwrite the old settings by following the “SET” + Memory Button procedure for each position. Always consult your owner’s manual for the exact procedure for your model year.
Q2: Can I save my seat position without the engine running?
A2: Generally, you need the ignition to be in the “on” position (or the engine running) for the seat and mirror motors to have sufficient power. If the ignition is only in the accessory mode, the adjustments may not work.
Q3: What’s the difference between pressing the memory button and holding it?
A3: Pressing and holding the memory button initiates the automatic adjustment to the saved position. Many systems will stop moving once it reaches the saved point, but some might continue until you release the button. If you only briefly press it, the seat will usually not move.
Q4: My mirrors aren’t saving with my seat. What could be wrong?
A4: Ensure that when you are saving the memory position, the mirror adjustment control is also set to “save” or is in a position that it will be recognized by the memory system. In some models, you might need to specifically activate mirror memory saving through the infotainment system. Also, confirm the mirror adjustment joystick is in a logical position, not pointing straight up or down, which might indicate a neutral or inactive state for saving.
Q5: Can I save different seat settings for different driving modes (e.g., Sport vs. Comfort)?
A5: While the seat memory system itself doesn’t directly link to driving modes, you can manually save different ideal positions to different memory buttons (e.g., Memory 1 for spirited driving, Memory 2 for comfortable cruising). You would then select the corresponding memory button based on your intended driving style.
Q6: How far back can my SL-Class seat go? My knees hit the steering wheel.
A6: The range of motion is designed to accommodate most drivers, but if you’re finding your knees are hitting the steering wheel even at the furthest seat position, ensure your steering wheel is also adjusted to its highest/most retracted setting. If you’re still experiencing issues, it might be worth consulting with a Mercedes-Benz dealership to explore potential ergonomic limitations or adjustments.
Q7: My passenger seat has memory buttons too. Can I set those as well?
A7: Yes, many SL models have memory seat buttons on the passenger door as well, allowing the front passenger to save their preferred seating, mirror, and sometimes steering wheel positions. The process is identical to setting up the driver’s side memory seats.


